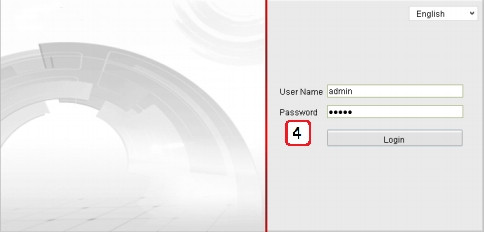
CCTV system admin default login and password
Safety is one of the basic requirements for any visual monitoring system. With the developments in technology and rise in popularity of visual systems and customer expectations, a need to effectively prevent unauthorised access to the system also arises. The network device manufacturers create new user authentication methods utilising the latest IT trends. Quite often, the system admin may lose access as a result of forgotten password. This article is a quick guide for CCTV network admins collecting information about the login methods for recorders and IP cameras and restoring the default settings of devices available in DELTA offer.
|
Before we move on to the practical instructions, let’s begin with an introduction.
|
The descriptions include the default IP addresses, logins and passwords with instructions to restore access, as well as some notes. Before using any network devices and dedicated apps for scanning IP addresses or ports, a subnet must be added to the computer’s network adapter.
|
Before the initial device configuration, it is recommended to assign a specific e-mail address and export the initial settings (where possible). It will allow to quickly restore access to the admin account if the password is lost again.
|
DELTA is not liable for any damage resulting from using the information provided in this article. User is liable for any damage caused by using the methods provided.
|
The guide includes links to the dedicates apps described in the article, also available to download as a ZIP archive (379MB).
|
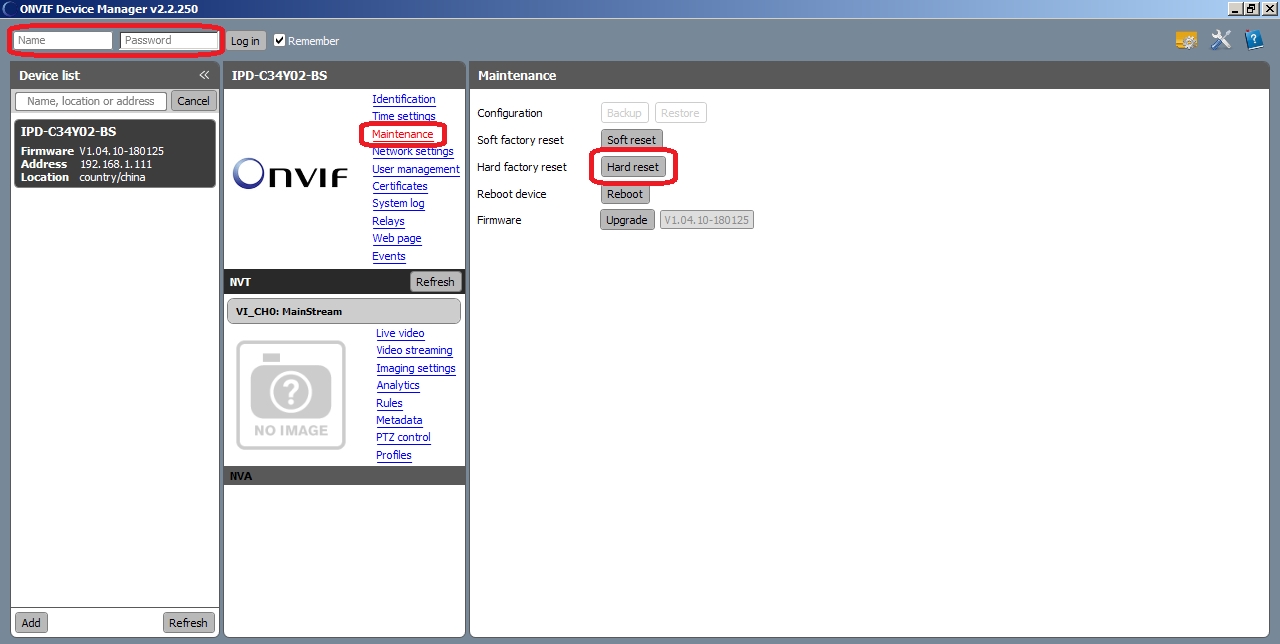
Apart from the dedicated software, you will also need a free app "ONVIF Device Manager v2.2.250". The app allows to manage, configure and restore the default settings of cameras with ONVIF protocol. The app is also available as an integral part of a multi-function software for CS series CCTV cameras available in DELTA offer.
|
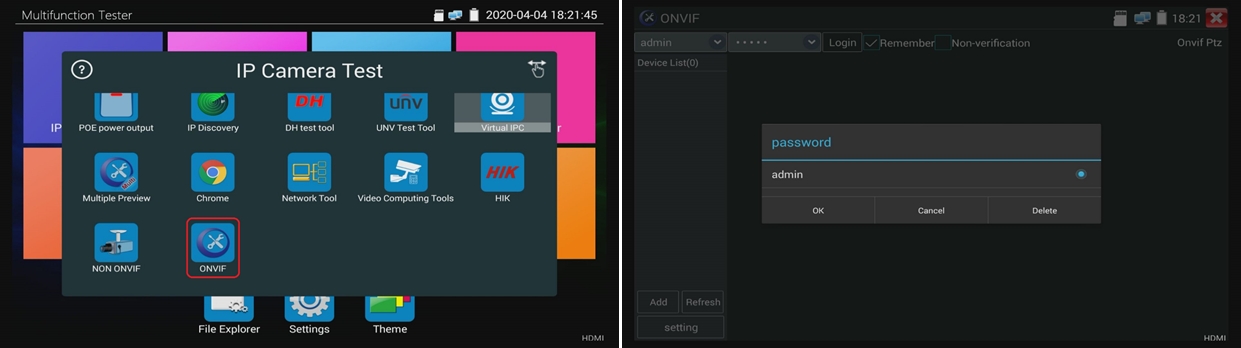
Using the default login and password, "admin", or without logging in (empty login and password field), you can hard reset many camera models without generating any codes or sending the devices to the service centre.
NOTE! The method for restoring the default settings in the app depends on the camera firmware version.
|
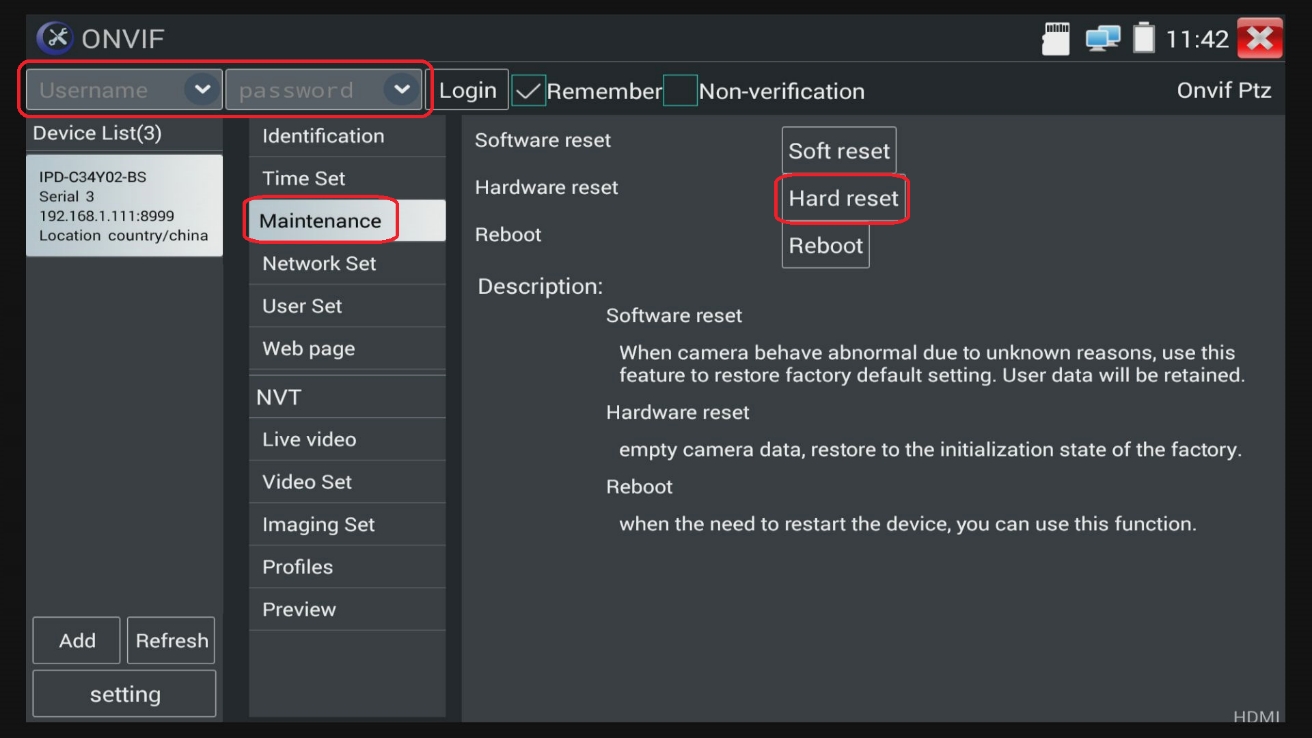
Photo 1-2. Restoring the default settings in APTI camera in ONVIF app of CS-H8F-70HQ tester. 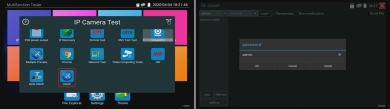
|
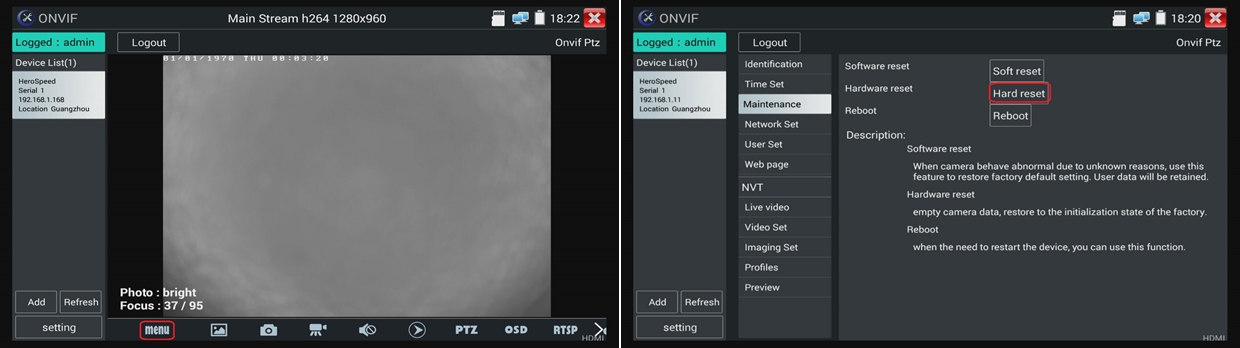
Photo 3-4. 
|
Photo 5. 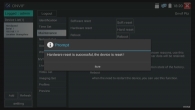
|
Photo 6. Using the hard reset function in "ONVIF Device Manager" to restore the default settings of APTI camera (Windows version). 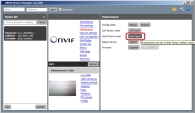
|
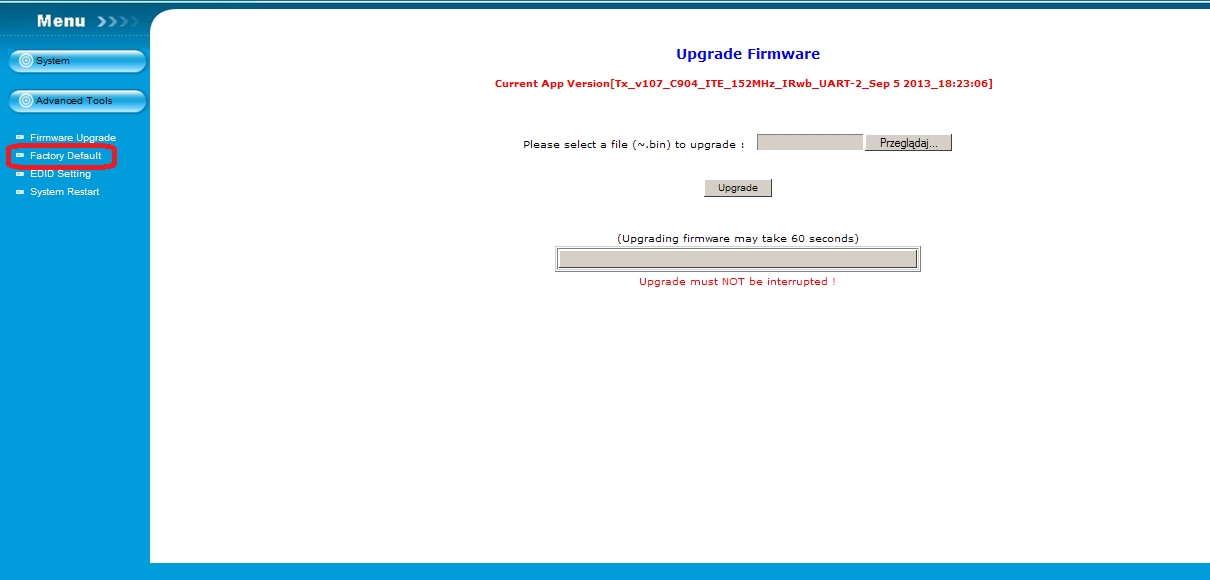
| Brand / Model | Default login, IP password | Restoring procedure and notes | | HDMI-EX-120 (ver. 1-3) | TX:192.168.168.55
RX:192.168.168.56
or
TX:192.168.1.238
RX:192.168.1.239 | Log in to the system and select the following options: Menu>Advanced Tools>Factory Default>Apply | | HDMI-EX-120-V4 | TX:192.168.1.210
RX:192.168.1.220 | The default settings cannot be restored by the user. The default settings can be restored by DELTA Service Department only. | | HDMI-EX-120-4K | TX:192.168.1.238
RX:192.168.1.239 | Menu>Advanced Tools>Factory Default>Apply | | HDMI-EX-120IR | TX:192.168.168.55
RX:192.168.168.56 | Menu>Advanced Tools>Factory Default>Apply | | HDMI-EX-120-V3 | TX:192.168.1.238
RX:192.168.1.239 | The default settings cannot be restored by the user. The default settings can be restored by DELTA Service Department only. | | HDMI-EX-150IR | TX:192.168.1.238
RX:192.168.1.239 | Menu>Advanced Tools>Factory Default>Apply | | HDMI-EX253-120 | TX:192.168.1.238
RX:192.168.1.239 | Menu>Advanced Tools>Factory Default>Apply | | HDMI+USB-EX-70-4K |  | The default settings cannot be restored by the user. The default settings can be restored by DELTA Service Department only. | | HDMI+USB-EX-100 | TX:192.168.168.55
RX:192.168.168.56 | Menu>Advanced Tools>Factory Default>Apply | | HDMI+USB-EX-100-4K | | The default settings cannot be restored by the user. The default settings can be restored by DELTA Service Department only. |
|
Photo 7. HDMI-EX-120 Ver. 2 Extender interface. 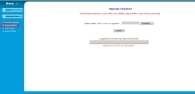
|
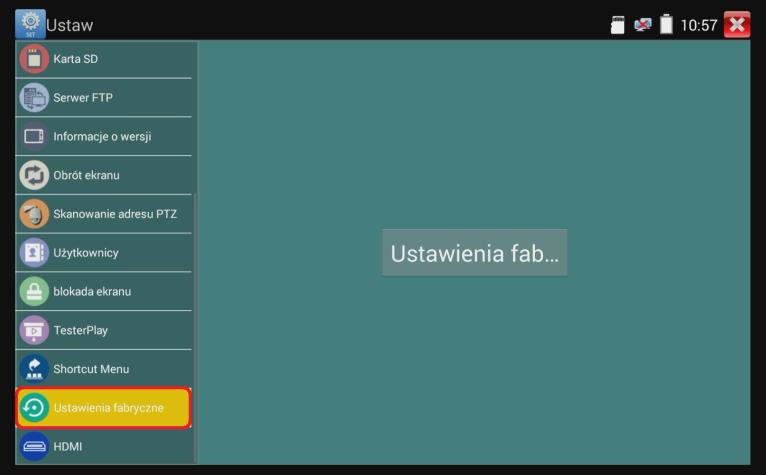
Photo 8. Entering the advanced settings in VMT-155M monitor. 
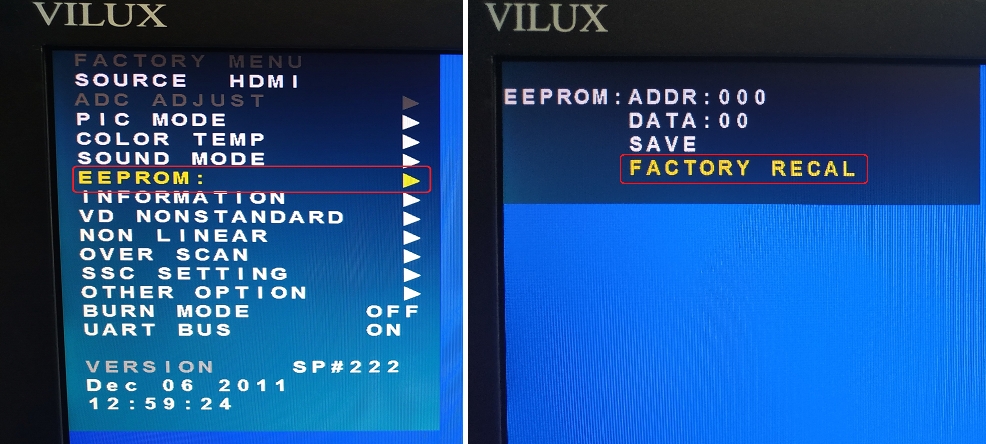
|
Photo 9. Restoring the default settings of VILUX monitor. 
|
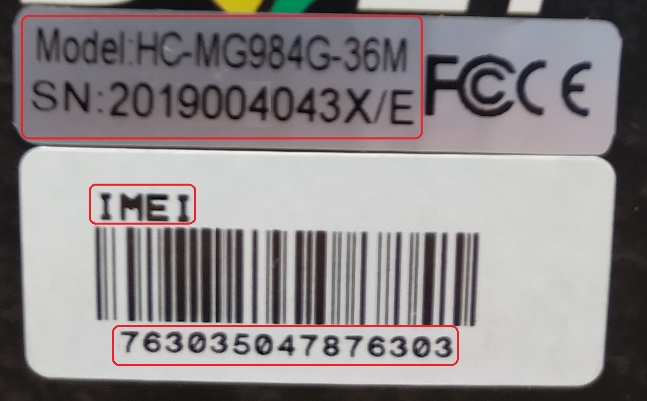
| Brand / Model | Restoring procedure and notes | | Series HC-xx, SG-xx | Select "Default Set" in the camera trap Menu to restore the default settings. The device locked by the user password can be unlocked by contacting DELTA - serwis@delta.poznan.pl Service Department. Required information: model, IMEI and device SN.
Note: User data are not removed automatically when the default settings are restored. SD card must be formatted in the device and the data stored in the Menu tabs must be removed manually. |
|
Photo 10. Information required for password reset for HC-MG984G-36M. 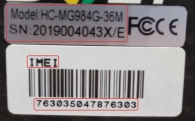
|
| Brand / Model | Restoring procedure and notes | CS-A-35VMT
CS-AIP-35
CS-AIP-43
CS-AIP-70M
CS-CIP-70M
CS-CTIP-43
CS-HA-35
CS-HB-43M
CS-HB-44M
CS-HB-70M
CS-HB-71M
CS-HBF-70MQ
CS-HBF-72MQ
CS-TIP-70M
CSC-18
CSC-24
CSC-25
DH-PFM900 DAHUA
DH-PFM900-E DAHUA
DH-PFM905 DAHUA
CSHD-03
CSHD-07
CSIP-10
CSIP-16
CSIP-17
CST-01
CST-12
CST-14
CST-706
PFM900-E DAHUA
PFM905-E DAHUA
PFM907
SP-IPT03
ST-601
ST-601/EN
ST-601/ES1
ST-W7-70/W | The default settings can by restored by DELTA Service Department only. | CS-H7-70
CS-H7-70H
CS-H7F-70HQ
CS-H8-70H
CS-H8F-70HQ
CS-H9-80H
CS-H9F-80HQ
CS-HB-65M
DH-PFM906 DAHUA
ST-35IPC | In the latest firmware version: Settings>Factory Default. | | CSHD-01 | Press and hold POWER/STANDBY for 10 seconds to reset. | CST-03
CST-701
STPV-1 | Press and hold RESET on the side of the tester for 3 seconds to restore the default settings. |
|
Photo 11. Restoring the default settings of CS-H8F-70H tester. 
|
| Brand / Model | Default MASTER CODE | Restoring procedure and notes | ATLO-KRM-103
ATLO-KRM-511
ATLO-KRM-512
ATLO-KRM-821
ATLO-KRM-823 | MASTER CODE: 999999 | 1. Turn off the device power.
2. Press and hold # and turn on the power supply .
3. The buzzer will sound twice and the factory settings will be restored. | ATLO-KRMF-511
ATLO-KRMF-555 | MASTER CODE: 999999 | Method 1: Disconnect the power supply, turn on and press #. After the LED changes to orange and the buzzer sounds twice, release #. The admin code is reset to its default value 999999.
Method 2:Turn off the device power, press and hold EXIT BUTTON and turn on the power. The buzzer will sound twice and the admin code will be restored to its default value 999999.
Note: The user data are not be removed automatically when the default settings are restored. | | ATLO-RFM-501 | MASTER CODE: 888888 | Turn off the device power, press and hold RESET (SW14) on the PCB. Turn on the power supply. After the buzzer sounds twice, release the button. LED will change to orange. In the next step read Admin Add Card and Admin Delete Card tabs or (after 10 seconds), the red LED will indicate that the factory settings has been restored.
Note: The user data are not be removed automatically when the default settings are restored. | | ATLO-RFM-505 | MASTER CODE: 888888 | Turn off the device power, press and hold RESET (SW14) on the PCB. Turn on the power supply. After the buzzer sounds twice, release the button. The factory settings will be restored. | | ATLO-KRM-855 | MASTER CODE: 999999 | Disconnect the power supply, press and hold # or EXIT BUTTON, turn on the power supply and wait until the buzzer sounds twice. The admin code will be restored to its default setting 999999.
Note: The user data are not be removed automatically when the default settings are restored. |
|
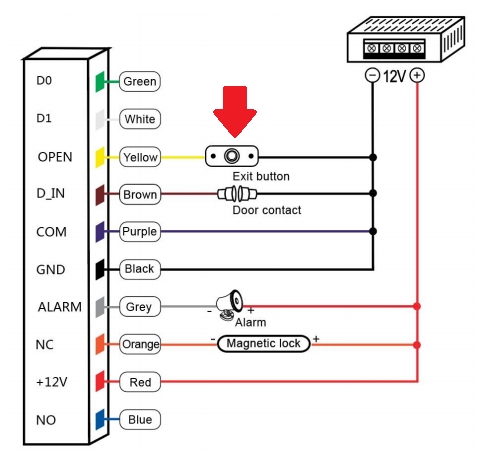
Fig. 1. Using Exit Buton to restore the default settings in ATLO-KRM-512. 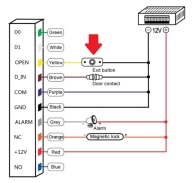
|
| Brand / Model | Default login, IP password | Restoring procedure and notes | | ATE-CAM-IPC650 | 192.168.1.1, 192.168.1.11
or
DHCP
LOGIN: admin PASSWORD: -empty- | Default settings: Remote settings > System Maintain > Restore Default | | ATE-CAM-IPC735 | 192.168.1.2, 192.168.1.11
or
DHCP
LOGIN: admin PASSWORD: -empty- | Default settings: Remote settings > System Maintain > Restore Default | | ATE-CAM-IPC925 | 192.168.1.3, 192.168.1.11
or
DHCP
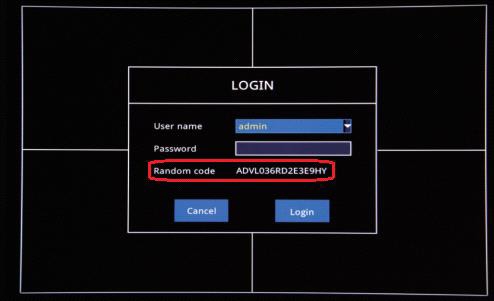
LOGIN: admin PASSWORD: -empty- | Default settings: Remote settings > System Maintain > Restore Default | ATE-D0401EF-T2
ATE-D0401-T2
ATE-D04SDEF-T2
ATE-D04SD-T2
ATE-D0801EF-T2
ATE-D0801-T2
ATE-N0401EF-T2 | LOGIN: admin PASSWORD: -empty- | Contact DELTA Service Department and provide the code displayed in the "Random code" field in the login screen.
Caution! While waiting for the password to unlock the device, the login screen must remain visible (opening the screen again will generate another "Random code"). |
|
Photo 12. ATE-D04SD-T2 recorder login screen. 
|
| Brand / Model | Default login, IP password | Restoring procedure and notes | | IP cameras | DHCP
or
192.168.1.13
LOGIN: admin PASSWORD: 123456
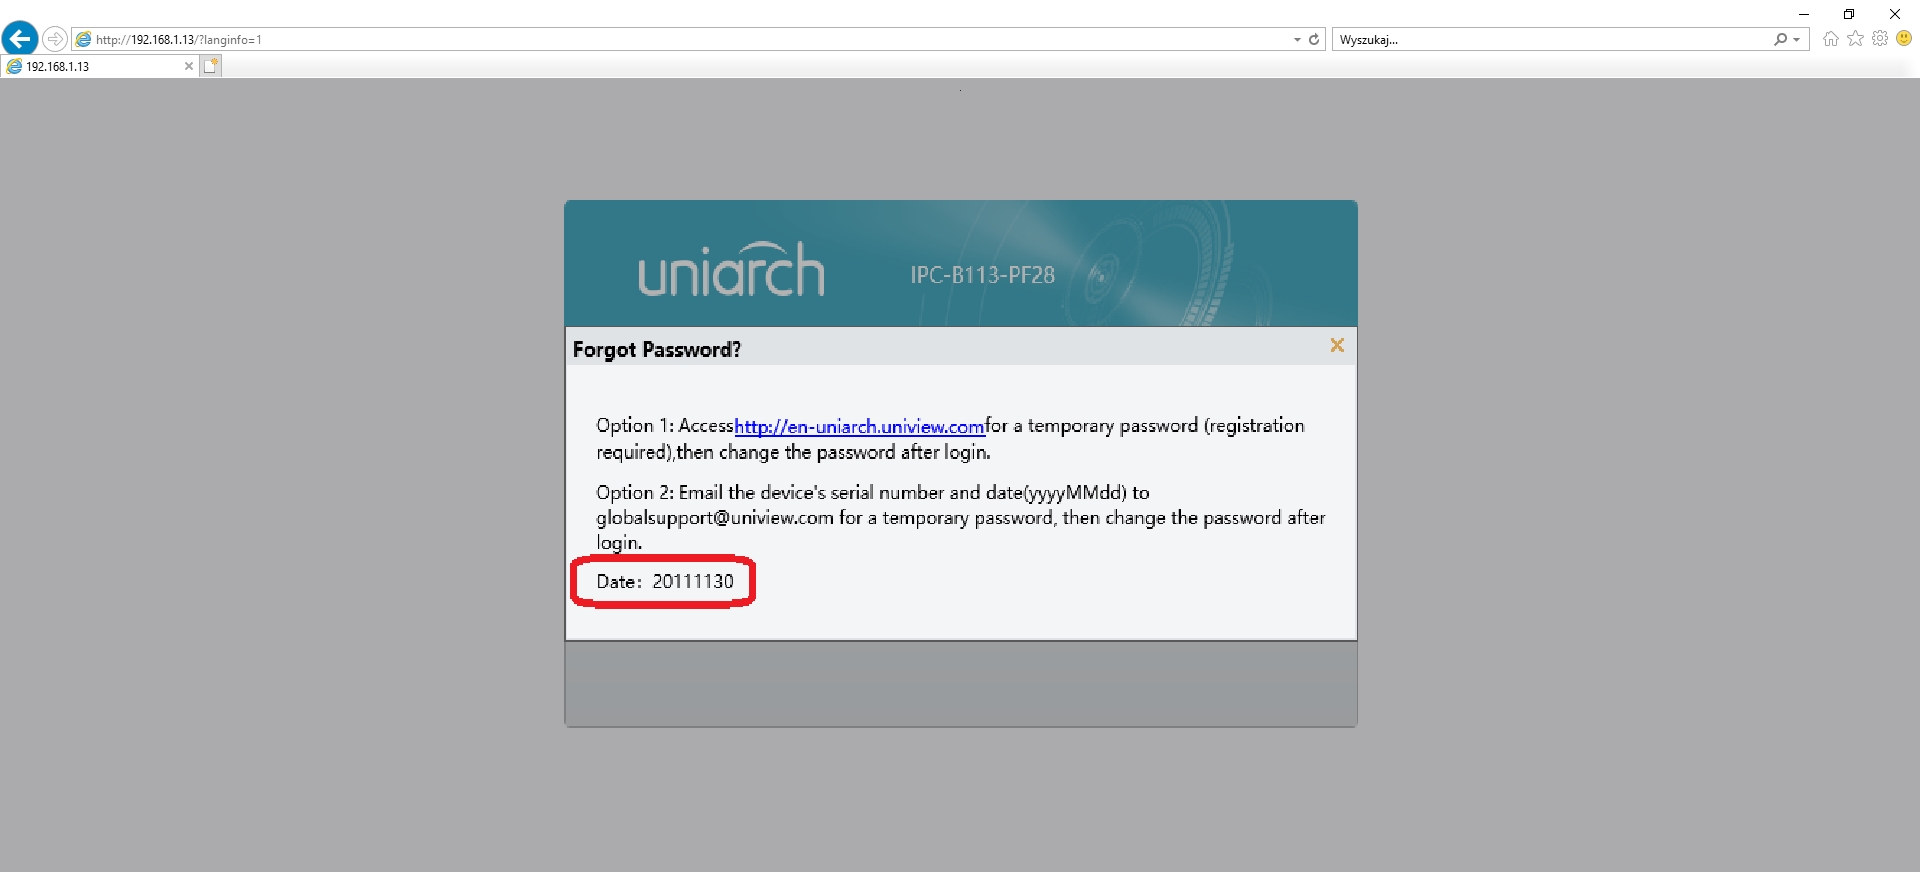
Caution! The admin account password must be set at the initial start-up. | Contact DELTA - serwis@delta.poznan.pl Service Department to restore the default device settings.
Required information: model, date displayed on the recorder screen, SN (serial number).
W To restore the default camera settings, determine its IP address using a dedicated app "EZTools" (43.3 MB). Log in using Internet Explorer and select "Forgot Password". Include the date displayed in the left bottom corner (see the picture below) in the request to the Service Department. | | recorders | DHCP
or
192.168.1.30
LOGIN: admin PASSWORD: 123456
Caution! The admin account password must be set at the initial start-up. | Contact DELTA - serwis@delta.poznan.pl Service Department to restore the default device settings.
Required information: model, date displayed on the recorder screen, SN (serial number).
W To restore the default camera settings, determine its IP address using a dedicated app "EZTools" (43.3 MB). Log in using Internet Explorer and select "Forgot Password". Include the date displayed in the left bottom corner (see the picture below) in the request to the Service Department. |
|
Photo 13. UNIARCH restore default setting screen. 
|
| Brand / Model | Default login, IP password | Restoring procedure and notes | | FLEX-xx recorders | 192.168.1.188
LOGIN: admin PASSWORD: -empty- or 123456 | Contact DELTA - serwis@delta.poznan.pl Service Department to restore the default device settings.
Required information: model and date displayed on the recorder screen. | | GEMINI-xx cameras | 192.168.1.88 or 192.168.1.188
LOGIN: admin PASSWORD: 123456 | GEMINI cameras must be returned to DELTA Service Department to restore the default settings. | | GT-xx cameras | 192.168.1.188
LOGIN: admin PASSWORD: -empty- | GEMINI cameras must be returned to DELTA Service Department to restore the default settings. | | GT-xx recorders | 192.168.1.189
LOGIN: admin PASSWORD: 888888 or -empty- | Contact DELTA - serwis@delta.poznan.pl Service Department to restore the default device settings.
Required information: model and date displayed on the recorder screen.
Depending on the firmware version, some devices must be returned to DELTA Service Department. |
|
| Brand / Model | Default login, IP password | Restoring procedure and notes | POLAR-080
POLAR-160 | 192.168.1.2
LOGIN: admin PASSWORD: 123456
LOGIN: user PASSWORD: 123456 | In case the admin password is lost, the default settings can by restored by DELTA Service Department only. |
|
| Brand / Model | Default login, IP password | Restoring procedure and notes | RAPID-Y41
RAPID-Y81
RAPID-Y161 | 192.168.1.2
LOGIN: admin PASSWORD: 123456
LOGIN: user PASSWORD: 123456 | In case the admin password is lost, the default settings can by restored by DELTA Service Department only. |
|
| Brand / Model | Default login, IP password | Restoring procedure and notes | | SMART | 192.168.1.168
LOGIN: admin PASSWORD: 12345 | Contact DELTA - serwis@delta.poznan.pl Service Department to restore the default device settings.
Required information: model and date displayed on the recorder screen. |
|
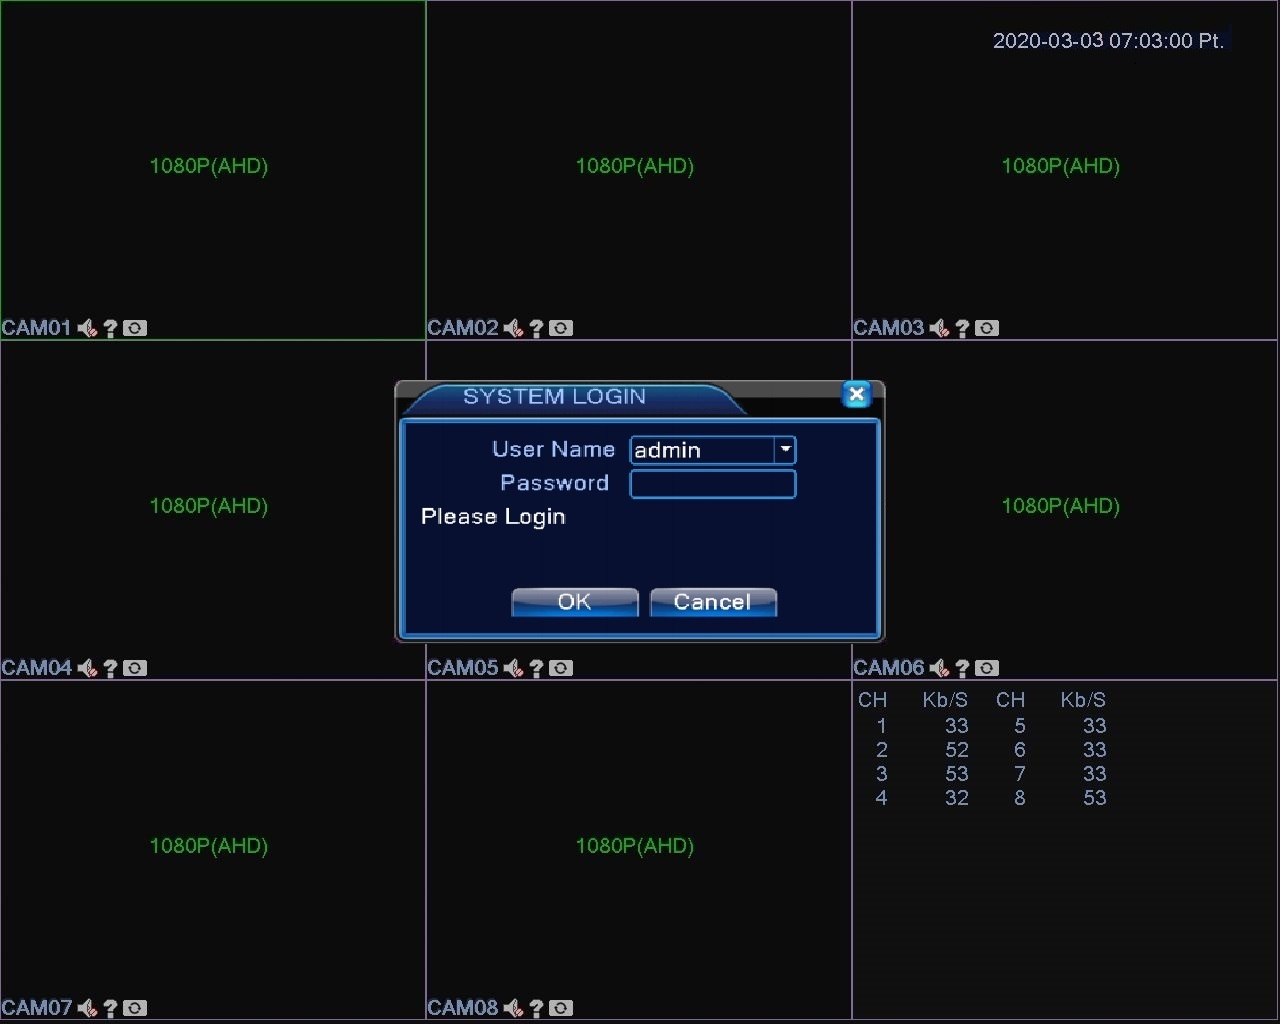
| Brand / Model | Default login, IP password | Restoring procedure and notes | | HYBRO-xx, HN2-xx recorders | 192.168.1.10
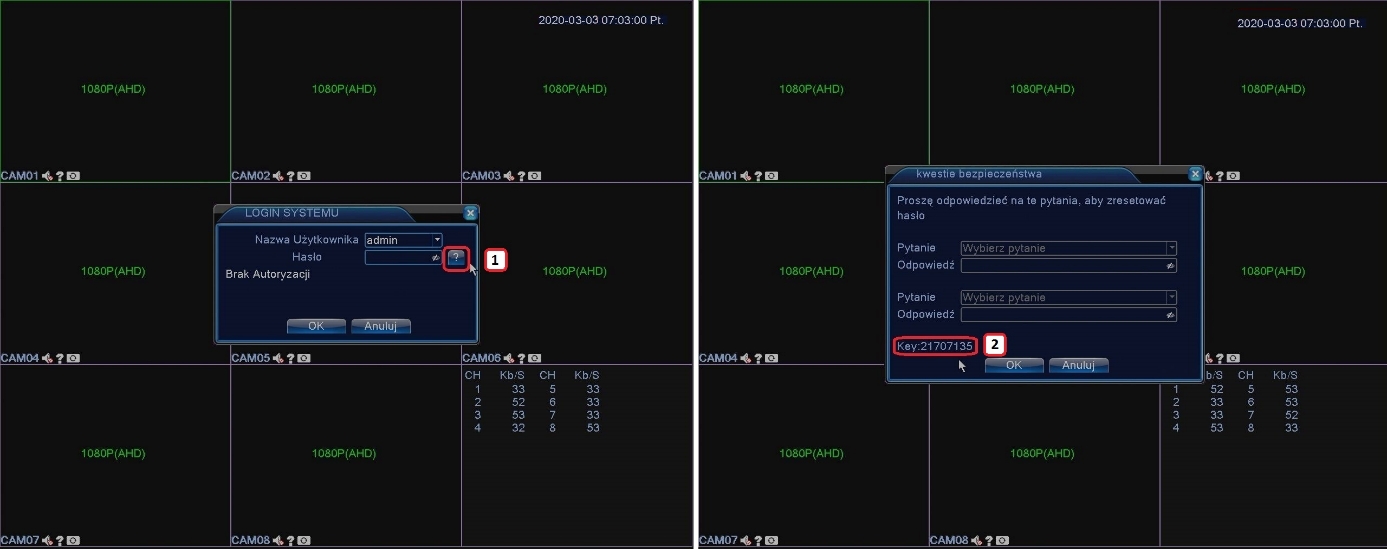
LOGIN: admin PASSWORD: -empty- | Variant 1 – for recorders with legacy firmware (no question mark in the login screen). Contact the Service Department serwis@delta.poznan.pl and provide the recorder model, date and time displayed in the top right corner of the login screen – Photo 14.
Variant 2 – for recorders with new firmware (with "Safe Code"). Contact the Service Department serwis@delta.poznan.pl and provide the recorder model and “Key” displayed after clicking the question mark on the right side of the login screen – Photo 15.
| | HN1-xx, HN2-xx cameras | 192.168.1.10
LOGIN: admin PASSWORD: -empty- | The default settings can by restored by DELTA Service Department only. |
|
Photo 14. Getting the current date in HYRBO recorder. 
|
Photo 15. Getting the Safe Code in HYRBO recorder. 
|
| Brand / Model | Default login, IP password | Restoring procedure and notes | LUMENA-02M1-12
LUMENA-12M1E-55
LUMENA-1M1-12
LUMENA-02M2
LUMENA-22M1-107
LUMENA-22M1-157
LUMENA-12M1-55
LUMENA-12M1E-147 | 192.168.1.18 or 192.168.1.110
LOGIN: admin PASSWORD: admin | Use one of the following variants depending on the firmware version:
Variant A - for cameras with bright login screen (manufactured before 2020).
Variant B – for cameras with dark login screen (manufactured after 2020). | LUMENA-14M1-55
LUMENA-32M1-157 | 192.168.1.110
192.168.1.18
192.168.1.200
LOGIN: admin PASSWORD: admin | Use one of the following variants depending on the firmware version:
Variant A - for cameras with bright login screen (manufactured before 2020).
Variant B – for cameras with dark login screen (manufactured after 2020). | | OMEGA-xx | 192.168.1.110
192.168.1.18
192.168.1.200
LOGIN: admin PASSWORD: admin | Use one of the following variants depending on the firmware version:
Variant A - for cameras with bright login screen (manufactured before 2020).
Variant B – for cameras with dark login screen (manufactured after 2020). |
|
Method 1:The default settings can be restored by installing a dedicated app for searching and configuring cameras IPWizardIII_2.1.1 (2.5MB).
Start device scan (1), select the camera (2), get the verification code (3), contact Service Department at: serwis@delta.poznan.pl. In your request, include the camera model and "Verification Code".
Caution! Do not disconnect the device and do not close the app until the return code is received!
Enter the code into "Authorization code" field (4) and click "Clear password".
|
Photo 16. Getting the Verification Code for OMEGA and LUMENA cameras. 
|
Method 2: Use "Onvif Device Manager" and enter the following credentials LOGIN:-empty- PASSWORD:-empty-. In "Maintenance" tab select "Hard reset".
|
Photo 17. Using Onvif Device Manager app for OMEGA and LUMENA cameras. 
|
Method 3: Similar procedure can be used in "ONVIF" for CS-xx testers.
Note: After the factory settings are restored without "KEEP IP" item selected, the camera IP address may change to: 192.168.1.100.
|
Photo 18. Restoring the default OMEGA and LUMENA camera settings using CS-H8F-70HQ tester. 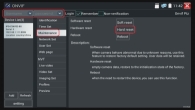
|
Install the dedicated app TestTool_v2.0.3.6906 (2.9MB) and search for your camera.
Make a screenshot or take a picture of the app screen with the camera found. Send a request for password reset including the screenshot/picture to the Service Department serwis@delta.poznan.pl.
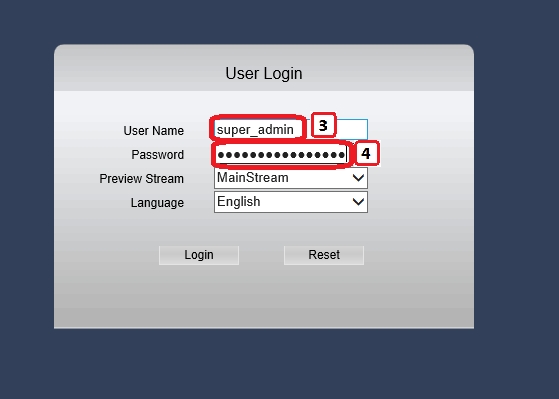
Login to the camera using super_admin login and the temporary password. Set a new admin password.
|
Photo 19. Restoring the default settings in cameras with dark login screen. 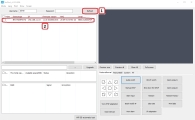
|
Photo 20. 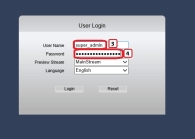
|
| Brand / Model | Default login, IP password | Restoring procedure and notes | | RC recorders | DHCP
LOGIN: admin PASSWORD: 1111 or 11111111 | The default settings can by restored by DELTA Service Department only. |
|
| Brand / Model | Default login, IP password | Restoring procedure and notes | | APTI cameras | 192.168.1.168
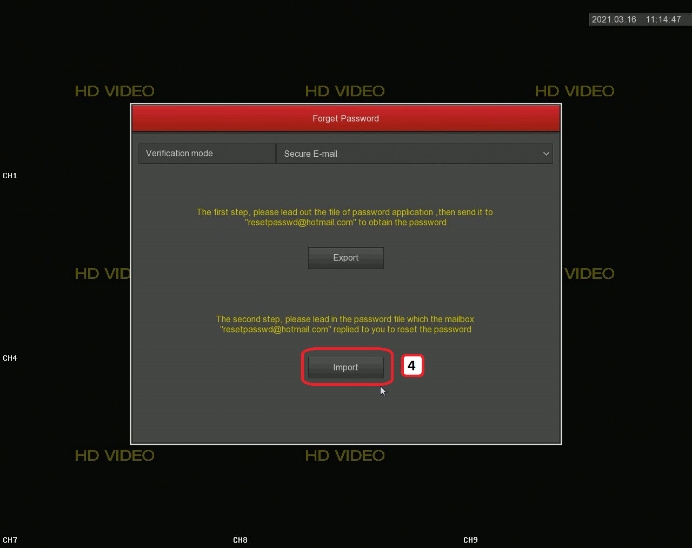
LOGIN: admin PASSWORD: admin | Method 1: Install a dedicated app "Search Tool" (9.0MB), search for and select your device and press ”Export” to generate a temporary file. Send the temporary file to serwis@delta.poznan.pl. Click "Forgot Password" (bottom right corner) to import the received file. Set a new admin account password.
Method 2: Use a "RESET" switch on the converter PCB (or at the end of the signal cable). Turn off the device power, press and hold the switch, turn on the device power and release the switch after 30 seconds.
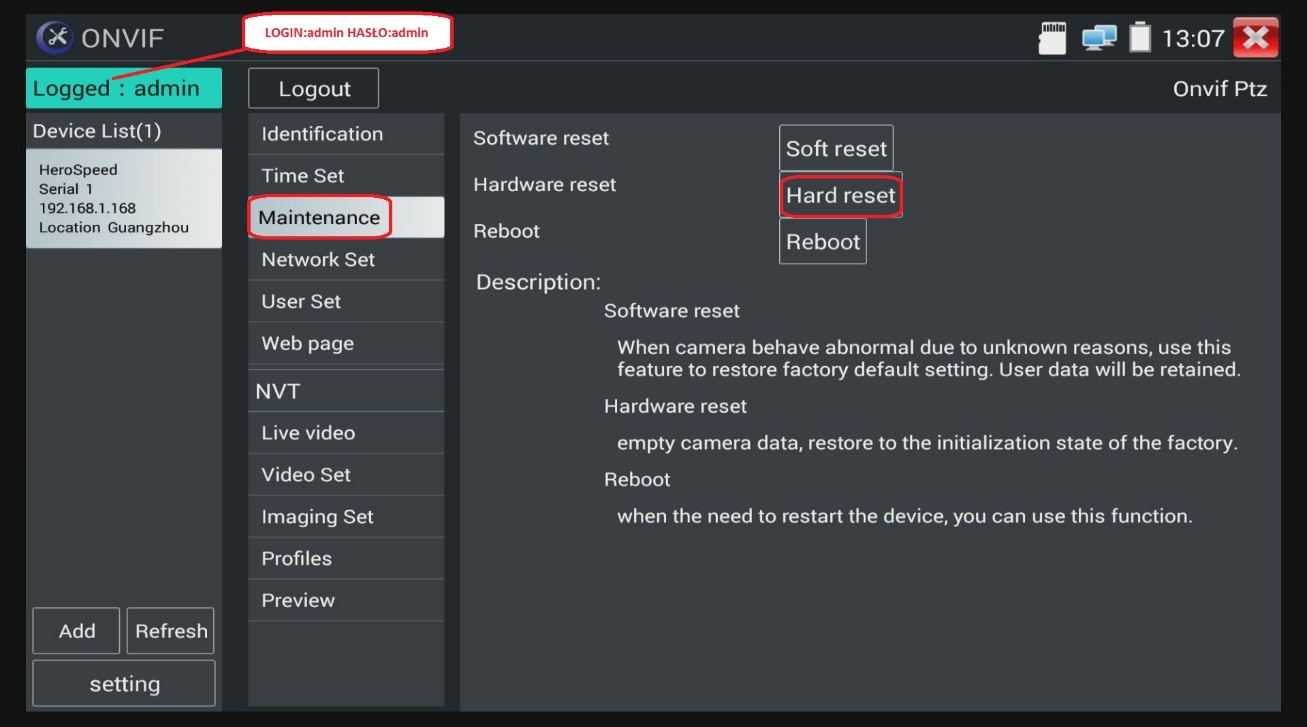
Method 3: Use a CS series tester, e.g. CS-H8F-70. Run "ONVIF" app, log in (LOGIN: admin PASSWORD: admin). Click: Menu > Maintenance > Hard reset.
CAUTION! The method for restoring the default settings in the app depends on the camera firmware version. | | APTI recorders | 192.168.1.88 or 192.168.1.168
LOGIN: admin PASSWORD: 12345 | Method 1 - Variant A: Install a dedicated app "Search Tool" (9.0MB), search for and select your device and press ”Export” to generate a temporary file. Send the temporary file to serwis@delta.poznan.pl. Click "Forgot Password" (bottom right corner) to import the received file. Set a new admin account password.
Method 1 - Variant B: In the login screen select "Forgot Password" and export the file. Send the file and the device model to serwis@delta.poznan.pl. Import the received file and set a new password for your admin account.
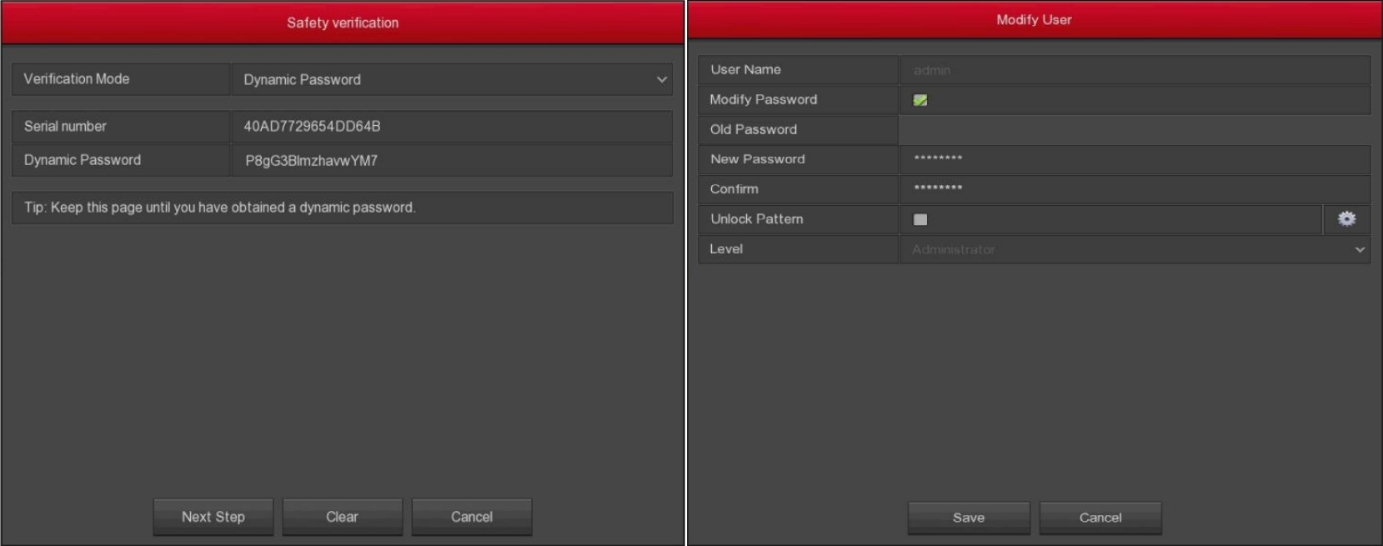
Method 1 - Variant C: Go to "Forgot Password" tab and select "Verification mode" and "Dynamic Password". Send the "Serial number" and the recorder model to serwis@delta.poznan.pl. Enter the received code in " Dynamic Password" and set a new password for your admin account.
Method 2: Use the switch on the main board of the recorder (selected models only). Turn off the device power, press and hold the switch, turn on the device power and release the switch after 30 seconds. |
|
Photo 21-24. Exporting and importing the file when restoring the default settings in Search Tool app for APTI devices (cameras and recorders with the latest firmware). 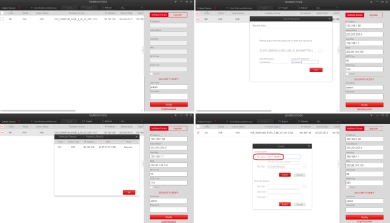
|
Photo 25-26. Exporting and importing the file when restoring the default APTI recorder settings (example 6 firmware version). 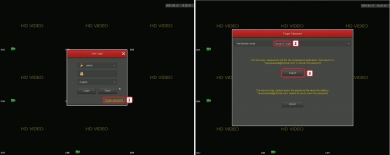
|
Photo 27. 
|
Photo 28-29. Restoring the admin account password using the dynamic password (example 9 firmware version). 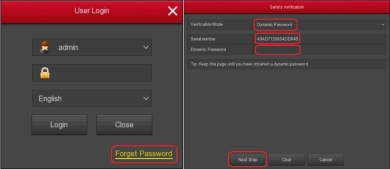
|
Photo 30-31. 
|
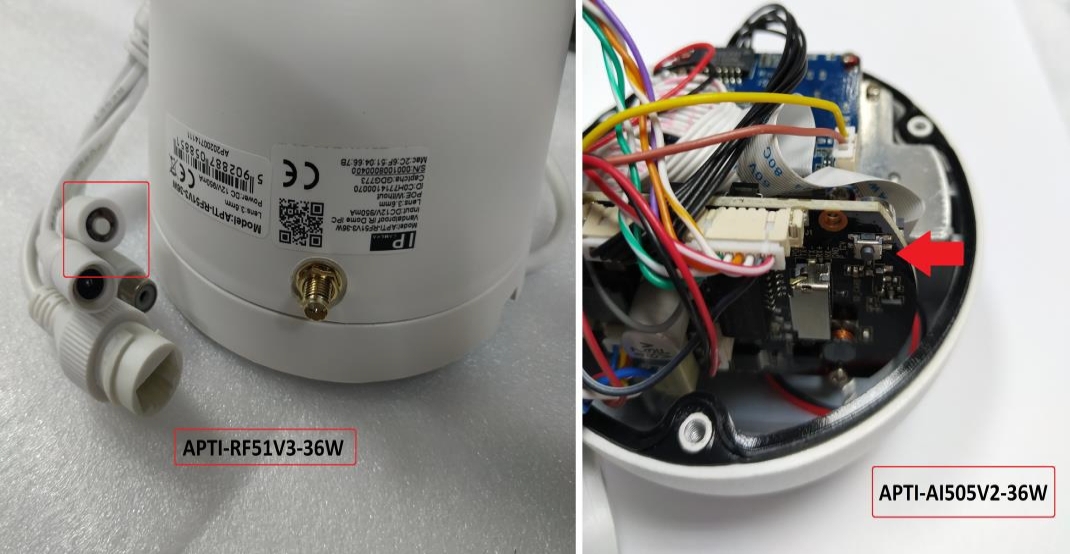
Photo 32-33. Hard reset using switches on the cable and on the APTI camera module. 
|
Photo 34. Example use of RESET/HARD RESET switch on APTI-N6408-4KS3 recorder. 
|
Photo 35. Example use of "ONVIF" app and CS-H8F-70H tester for resetting APTI-350C2-28WP camera. 
|
| Brand / Model | Default login, IP password | Restoring procedure and notes | | DAHUA cameras | 192.168.1.108
LOGIN: admin PASSWORD: -empty-
LOGIN: admin PASSWORD: admin
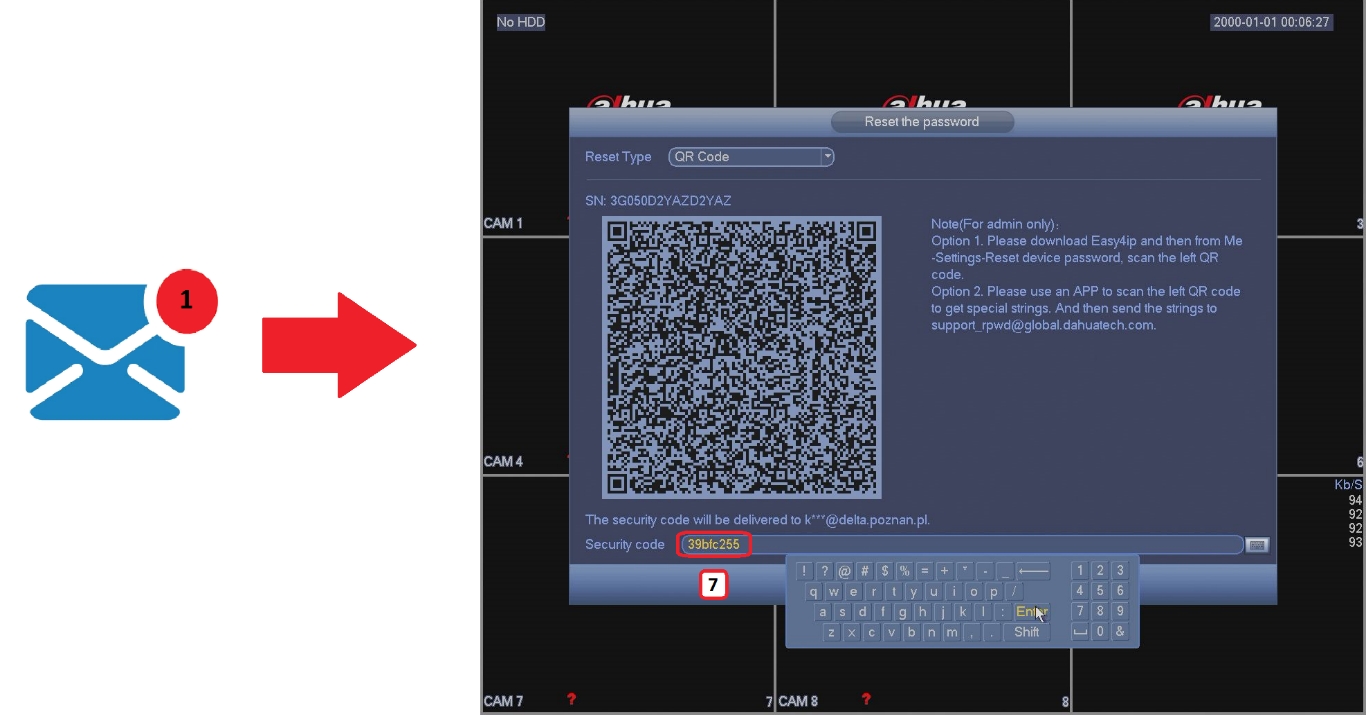
Caution! The admin account password must be set at the initial start-up. | Method 1: To restore the default settings, use "DMSS" app by DAHUA and follow the instructions below - Photo 36-39.
Method 2: Using the switch on the camera. Turn off the device power, press and hold the switch, turn on the device power and release the switch after 30 seconds - Photo 40-51.
Method 3: Connect the Jumper reset pins on the converter’s PCB. Connect the pins with pointed metal tweezers, connect the camera power supply and release the pins after 30 seconds. - Photo 52. | | DAHUA recorders | 192.168.1.108
LOGIN: admin PASSWORD: admin
LOGIN: default PASSWORD: default
LOGIN: 888888 PASSWORD: 888888
Caution! The admin account password must be set at the initial start-up. | Method 1: To restore the default settings, use "DMSS" app by DAHUA and follow the instructions below - Photo 36-39.
Method 2: Use the switch on the main board of the recorder (selected models only). Turn off the device power, press and hold the switch, turn on the device power and release the switch after 30 seconds - Photo 54.
Method 3: Connect the Jumper reset pins on the recorder’s main board. Connect the "J1" pins with pointed metal tweezers, turn on the device power and release the pins after 30 seconds. Photo 53. |
|
Photo 36-37. Restoring the default settings in DAHUA recorder using DMSS app. 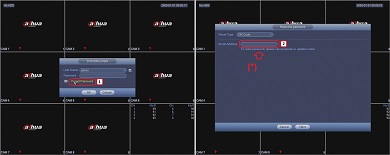
|
(*) Enter the e-mail address you want to receive the admin password reset code to.
|
Photo 38. 
|
Photo 39. 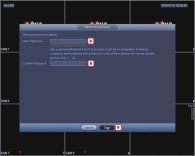
|
Method 2-3:
|
Using a switch and Jumper reset for cameras.
|
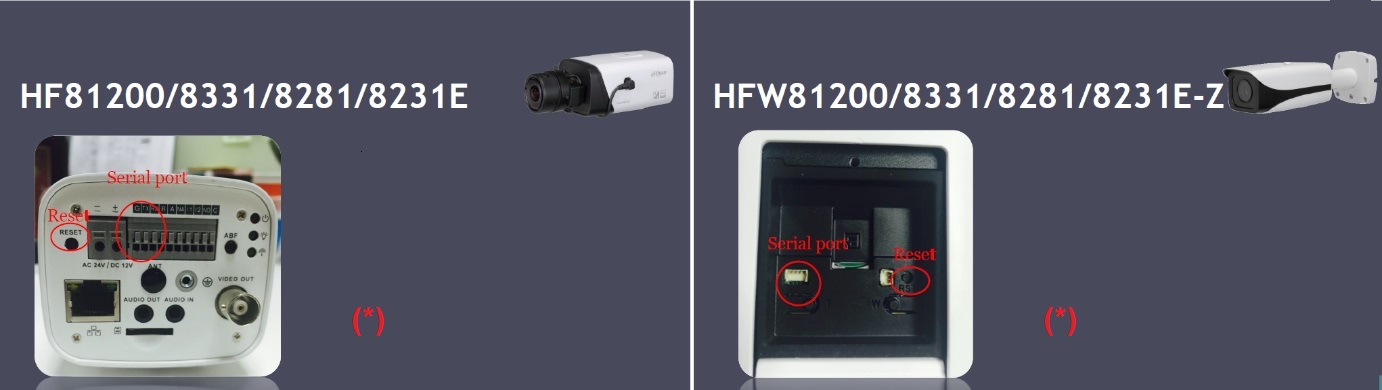
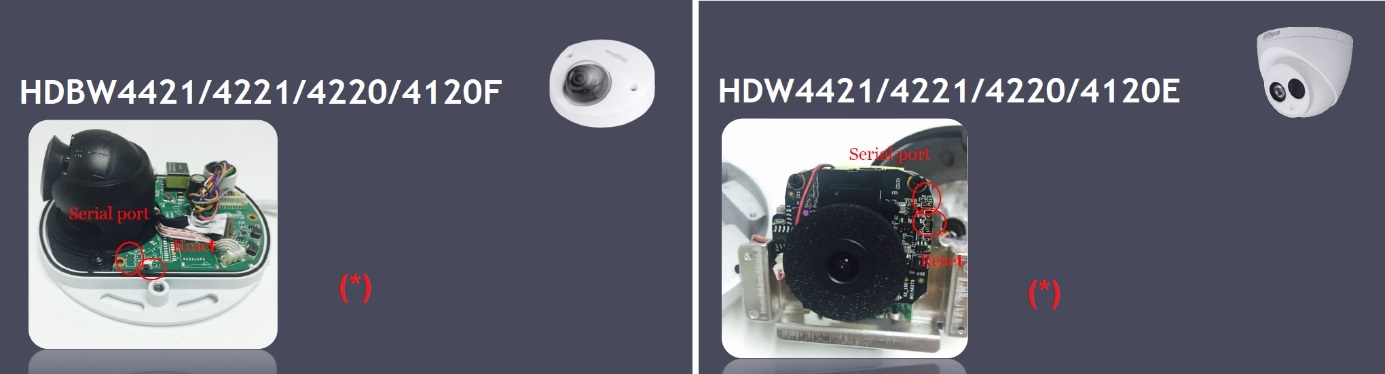
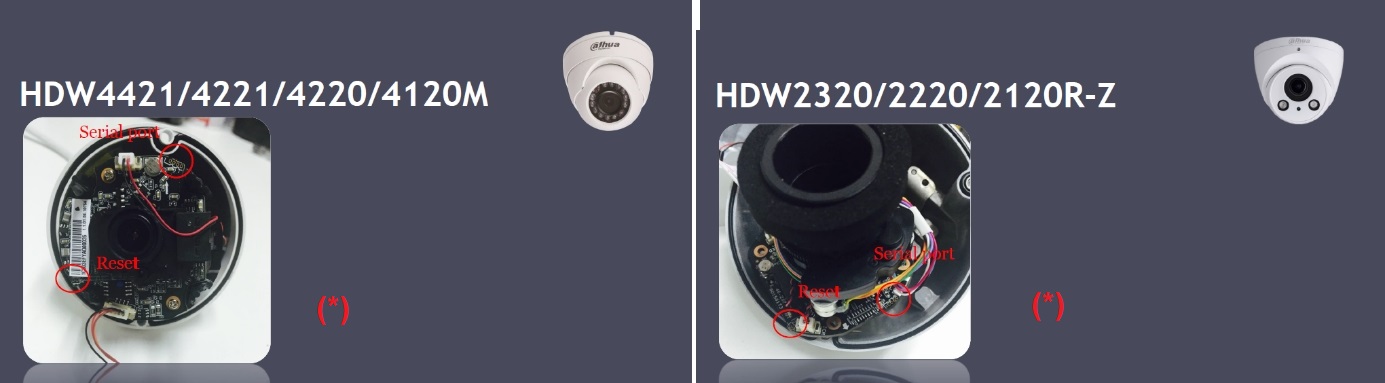
Photo 40-41. Using a switch and Jumper reset to restore the default settings in DAHUA cameras.
Detailed photos provided by DAHUA . 
|
Photo 42-43. 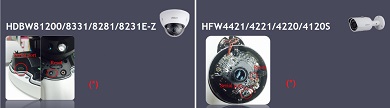
|
Photo 44-45. 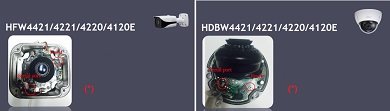
|
Photo 46-47. 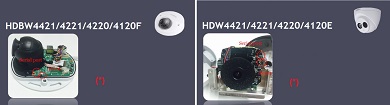
|
Photo 48-49. 
|
Photo 50-51. 
|
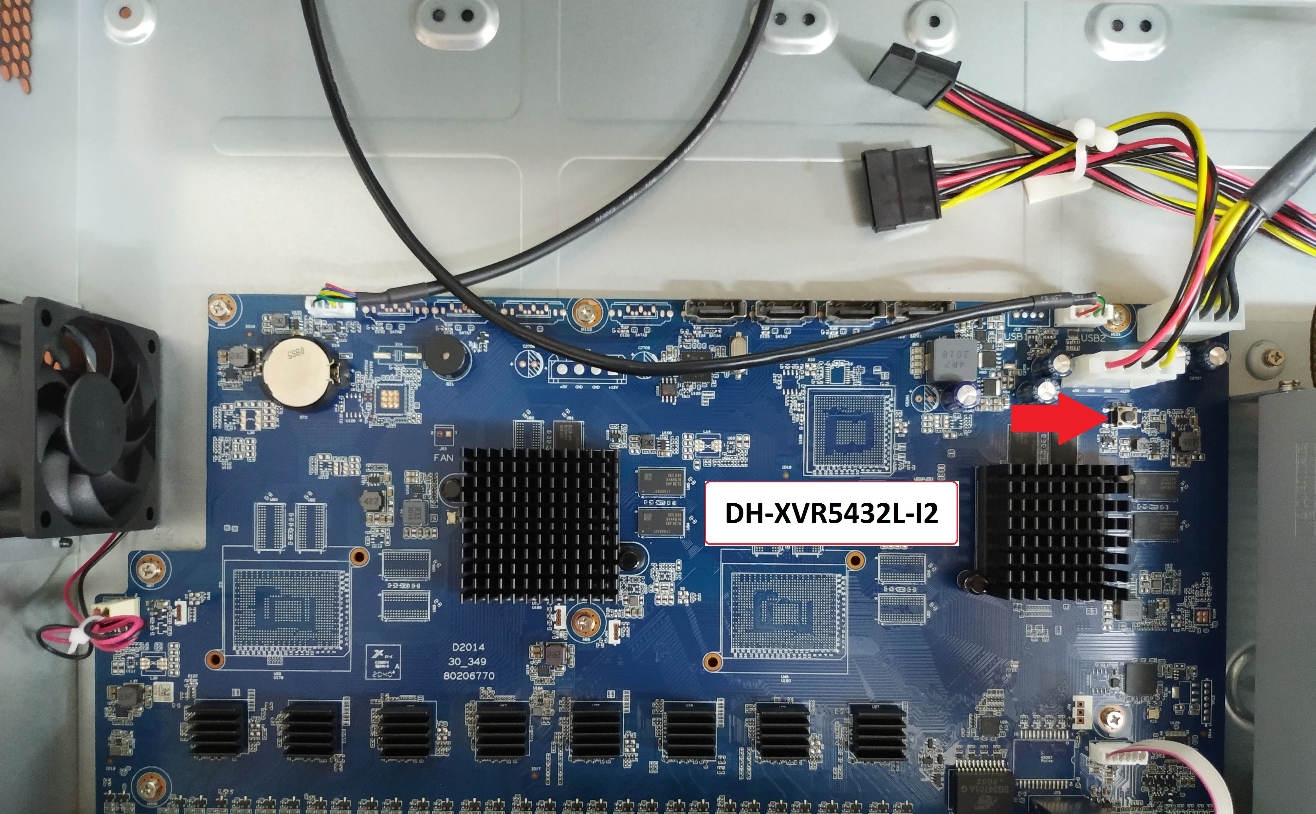
(*) Restoring the default settings: press and hold "RESET" for 30 seconds.
|
Photo 52. 
|
Method 2-3:
|
Using the switch and Jumper reset in DAHUA recorders.
|
Photo 53. Restoring the default DAHUA recorder settings using Jumper reset. 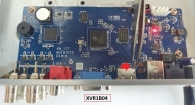
|
Photo 54. Restoring the default DAHUA recorder settings using the switch. 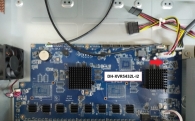
|
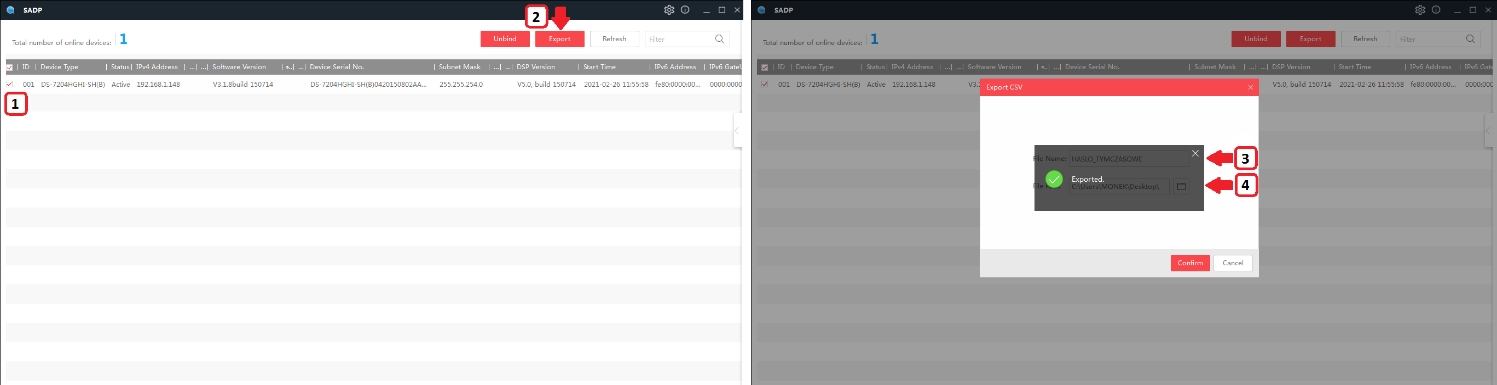
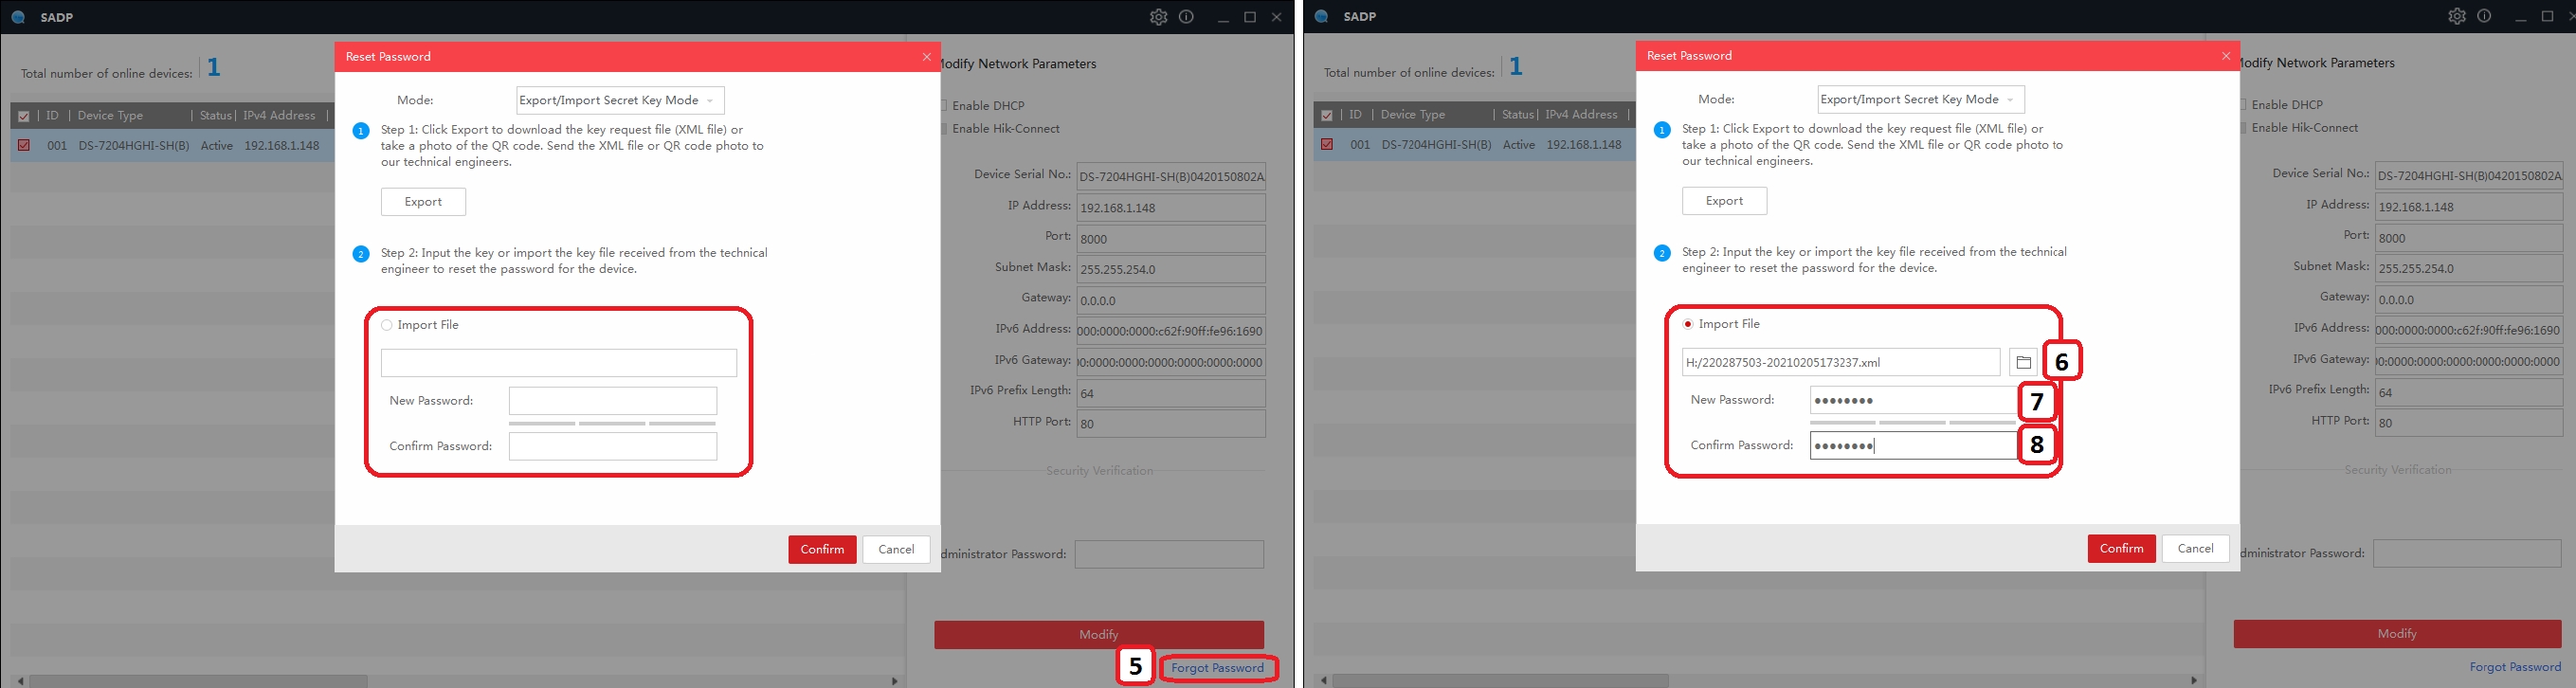
| Brand / Model | Default login, IP password | Restoring procedure and notes | | HIKVISION cameras | 192.168.1.64
LOGIN: admin PASSWORD: -empty-
Caution! The admin account password must be set at the initial start-up. | Method 1: Connect the device to your PC’s network adapter to restore the default settings. Download and run "SADP" (36.3 MB) app.
Use one of the following variants depending on the firmware version:
Variant A: for devices with firmware version from 5.3.0 inclusive select "Forgot Password", and export the temporary file using "Export" (the device must be connected at all times until the return password is received).
Send a request for password reset with the generated file to: serwis@delta.poznan.pl. Add the received .xml file in "Import File" window. Set a new admin password - Photo 55-58.
Variant B: for firmware version older than 5.3.0 contact DELTA serwis@delta.poznan.pl Service Department.
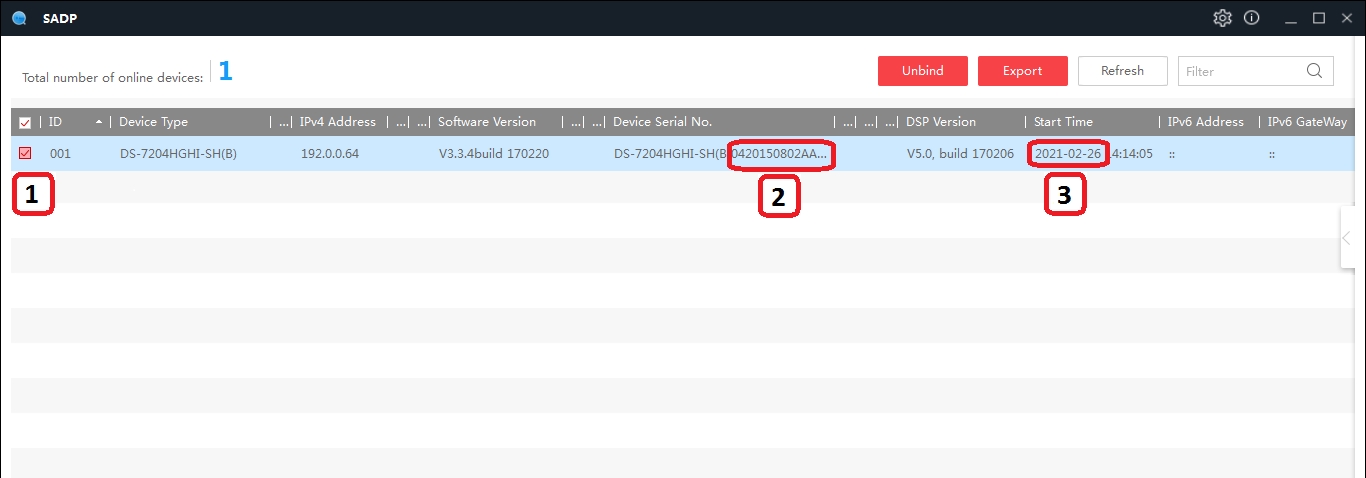
Required information: device model, serial number and date (use a dedicated "SADP" (36.3 MB) app). Use the temporary password generated by the Service Department as the admin password. Set a new password – Photo 63-64
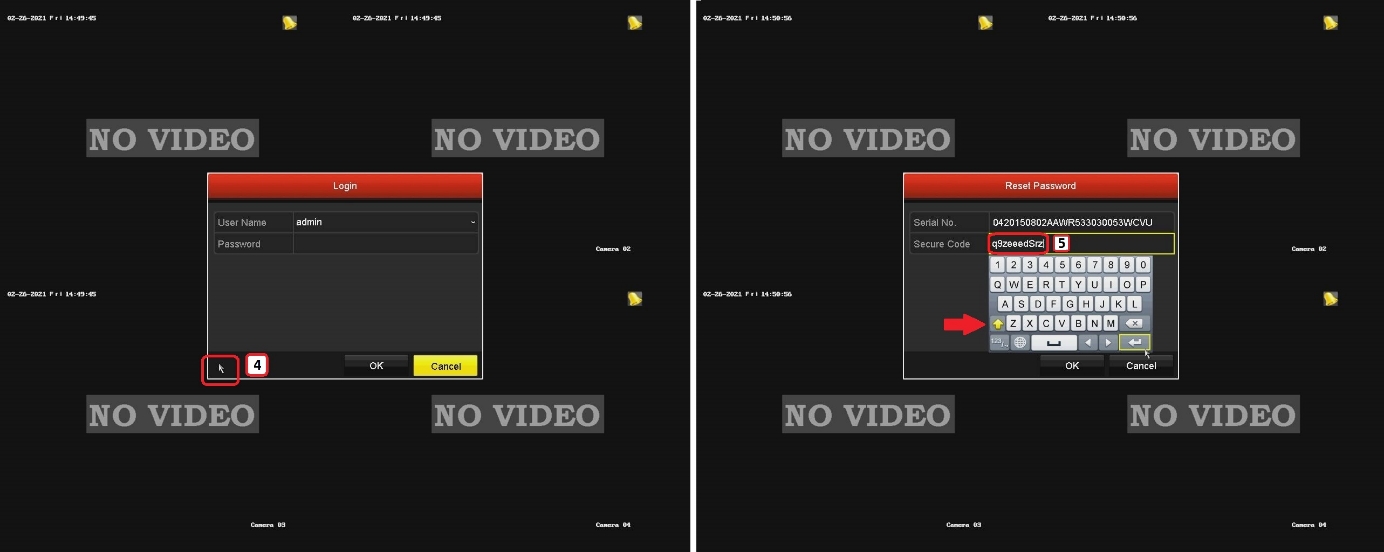
Method 2: Use a switch on the camera or inside the camera (selected models only). Turn off the device power, press and hold the switch, turn on the device power and release the switch after 30 seconds - Photo 65. | | HIKVISION recorders | 192.168.1.64
LOGIN: admin PASSWORD: -empty-
Caution! The admin account password must be set at the initial start-up. | Connect the device to your PC’s network adapter to restore the default settings. Download and run "SADP" (36.3 MB) app.
Use one of the following variants depending on the firmware version:
Variant A: for devices with firmware version from 3.1.6 inclusive select "Forgot Password", and export the temporary file using "Export" (the device must be connected at all times until the return password is received).
Send a request for password reset with the generated file to: serwis@delta.poznan.pl. Add the received .xml file in "Import File" window. Set a new admin password - Photo 55-58.
Variant B: for firmware version older than 3.1.6 contact DELTA serwis@delta.poznan.pl Service Department.
Required information: device model, serial number and date (use a dedicated "SADP" (36.3 MB) app). Use the temporary password generated by the Service Department as the admin password. (open the previously hidden screen in the left bottom corner of the login screen). Set a new password – Photo 59-62
|
|
Variant A – for cameras and recorders
|
Photo 55-56. Restoring the default settings in HIKVISION devices using SADP app (variant A for recorders with firmware versions from 3.1.6, inclusive and cameras with firmware version from 5.3.0, inclusive). 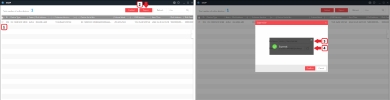
|
Photo 57-58. 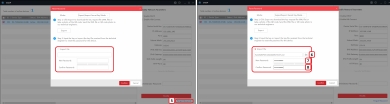
|
Variant B – for recorders
|
Photo 59. Restoring the default settings in HIKVISION recorder (variant B for firmware version older than 3.1.6). 
|
Photo 60-61. 
|
Photo 62. 
|
Variant B – for IP cameras
|
Photo 63. Restoring the default settings in HIKVISION camera (variant B for firmware version older than 5.3.0). 
|
Photo 64. 
|
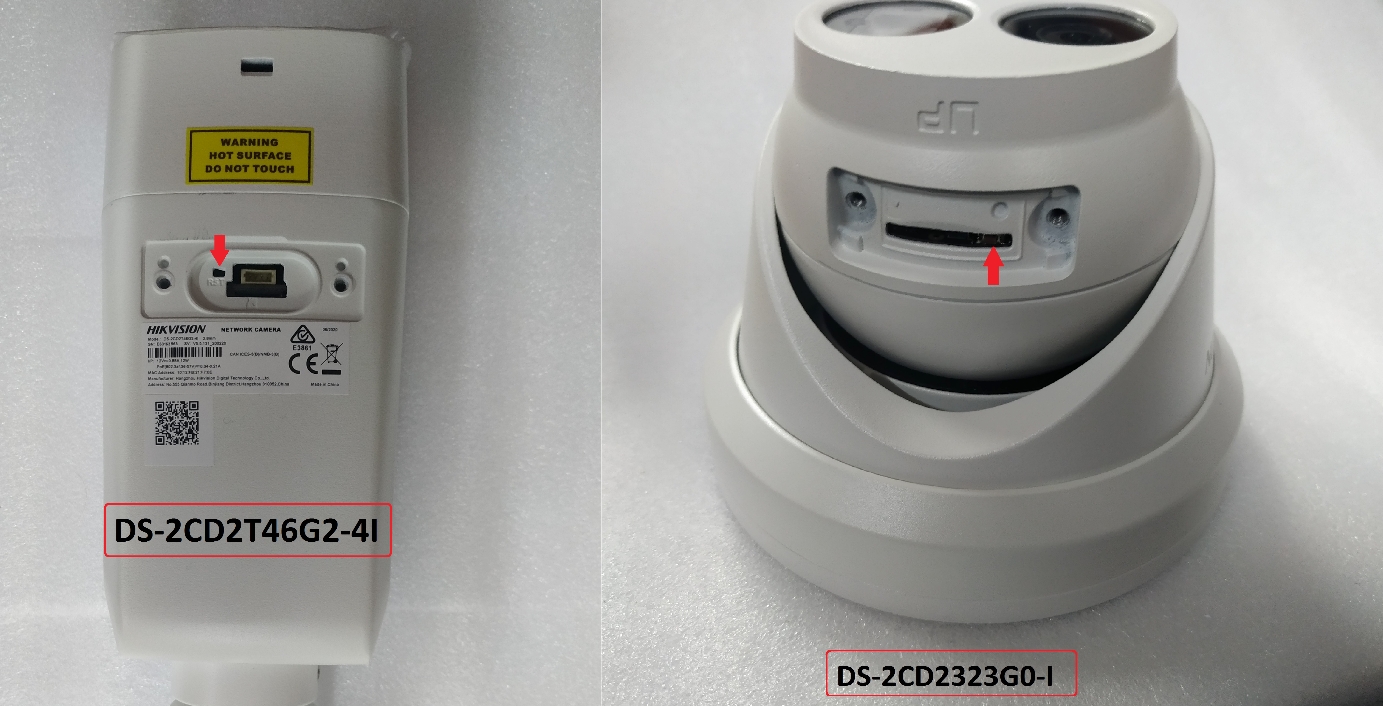
Photo 65. Hard reset using a switch in HIKVISION camera modules. 
|
| Brand / Model | Default login, IP password | Restoring procedure and notes | | BCS cameras | 192.168.1.108
LOGIN: admin PASSWORD: -empty-
LOGIN: admin PASSWORD: admin
Caution! The admin account password must be set at the initial start-up. | Method 1: To restore the default settings, use "BCS Line" app by BCS and follow the instructions below - Photo 66-72.
Method 2: Using the switch on the camera. Turn off the device power, press and hold the switch, turn on the device power and release the switch after 30 seconds - Photo 73-74.
Method 3: Connect the Jumper reset pins on the converter’s PCB. Connect the pins with pointed metal tweezers, connect the camera power supply and release the pins after 30 seconds. See procedure for DAHUA devices - Photo 40-52. | | BCS recorders | 192.168.1.108
LOGIN: admin PASSWORD: admin
LOGIN: default PASSWORD: default
LOGIN: 888888 PASSWORD: 888888
Caution! The admin account password must be set at the initial start-up. | Method 1: To restore the default settings, use "BCS Line" app by BCS and follow the instructions below - Photo 66-72.
Method 2: Use the switch on the main board of the recorder (selected models only). Turn off the device power, press and hold the switch, turn on the device power and release the switch after 30 seconds - Photo 75.
Method 3: Connect the Jumper reset pins on the recorder’s main board. Connect the "J1" pins with pointed metal tweezers, turn on the device power and release the pins after 30 seconds. See procedure for DAHUA devices |
|
Method 1:
|
Restoring the default settings in cameras and recorders using BCS Line app.
|
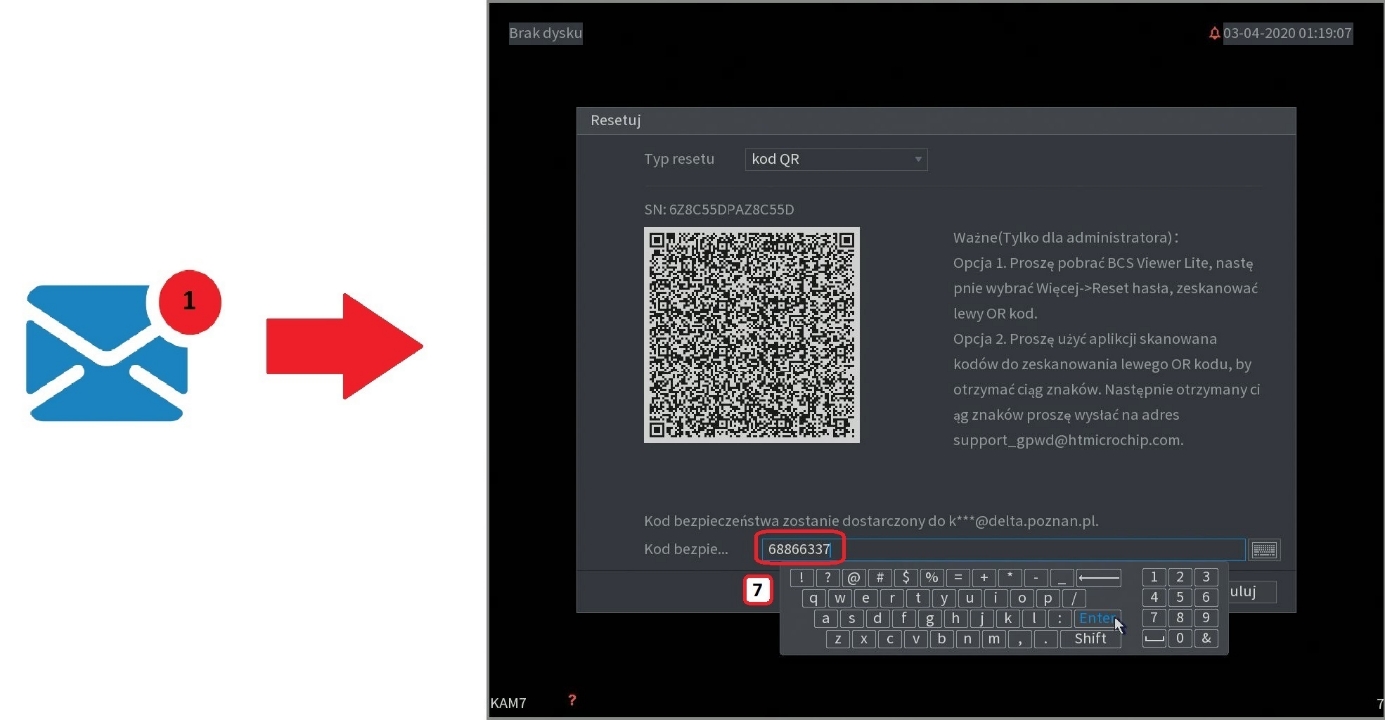
Photo 66-67. Using BCS Line app to reset the password. 
|
(*) Enter the e-mail address you want to receive the admin password reset code to.
|
Photo 68-71. 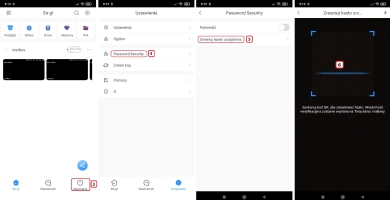
|
Photo 72. 
|
Method 2:
|
Switches in BCS camera modules.
|
Photo 73-74. Hard reset using a switch in BCS camera modules. 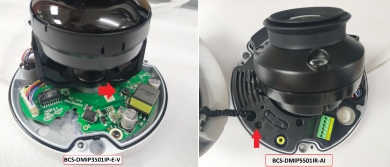
|
Method 3:
|
Using a switch on BCS recorders.
|
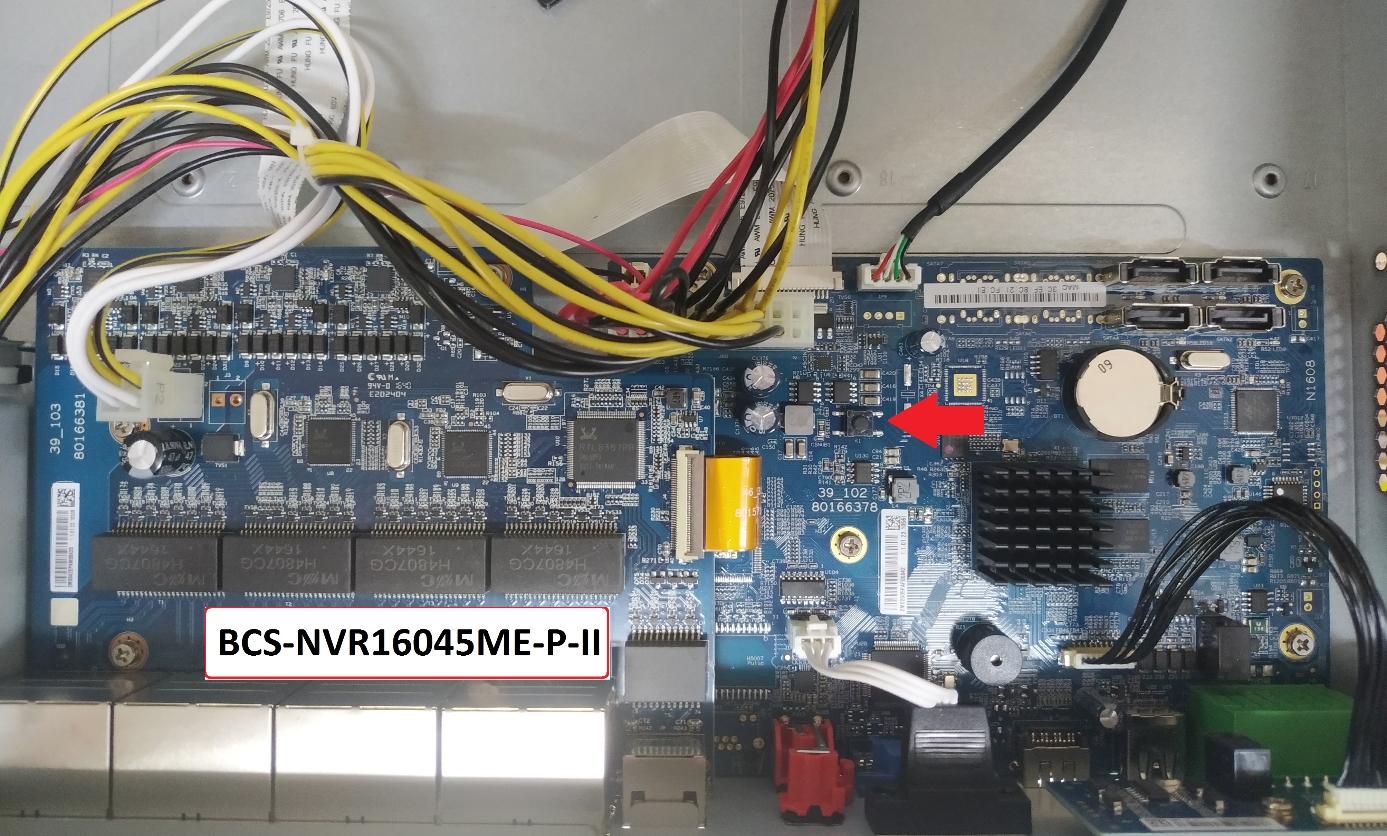
Photo 75. Example use of the RESET/HARD RESET switch on BCS-NVR16045ME-P-II recorder. 
|
|